Ginger (Zingiber officinale) is a popular spice known for its culinary and medicinal properties. It’s not only delightful in foods but also offers several health benefits, including anti-inflammatory and antioxidant properties. Growing ginger at home, especially in a grow bag, is a simple and fulfilling gardening project. This guide provides essential knowledge on how to grow ginger successfully in a grow bag, from selecting the right materials to harvesting your crop.
Table of Contents
- Why Grow Ginger at Home?
- Selecting the Right Grow Bag
- Choosing the Ginger Seed
- Preparing the Growing Medium
- Planting Ginger in a Grow Bag
- Caring for Your Ginger Plant
- Harvesting Ginger
- FAQs
1. Why Grow Ginger at Home?
Growing ginger at home provides numerous advantages:
- Freshness: You have access to fresh ginger whenever you need it, enhancing the flavor of your dishes.
- Quality Control: You control how the ginger is grown, ensuring it’s organic and free of chemicals.
- Space Efficiency: Grow bags take up less space than traditional gardening methods, making it perfect for urban environments or small yards.
- Educational: Gardening can be a rewarding hobby that teaches patience and responsibility.
2. Selecting the Right Grow Bag
The success of growing ginger in a grow bag greatly depends on the size and material of the bag. Here are some considerations:
- Size: Choose a grow bag that is at least 10-12 inches deep and 12-14 inches wide. Ginger has a rhizomatous root structure that requires ample space to grow.
- Material: Opt for breathable fabric grow bags, which allow for proper drainage and aeration. Avoid plastic bags as they can trap moisture, leading to root rot.
- Drainage: Ensure that the bags have drainage holes. If they don’t, add several holes to prevent water accumulation.
3. Choosing the Ginger Seed
Choosing the right ginger seed is crucial for a successful harvest:
- Organic Ginger Rhizome: Purchase organic ginger rhizomes from a reliable source. Ensure they are fresh, firm, and free from disease or mold.
- Growth Buds: Look for rhizomes with growth buds (eyes), which are small nubs where new shoots will sprout. Bigger and plump rhizomes generally yield better results.
- Preparation: If you buy a larger rhizome, consider cutting it into pieces, each with at least one growth bud. Allow cut pieces to dry for 24 hours before planting to prevent rot.
4. Preparing the Growing Medium
The growing medium is vital for ginger’s growth. Here’s how to prepare it:
-
Soil Type: A well-draining, loamy soil mix is ideal. You can create your own mix using:
- 1 part potting soil
- 1 part compost (for nutrients)
- 1 part perlite or sand (for drainage)
-
pH Level: Ginger prefers slightly acidic to neutral soil (pH 6.0 to 6.5). Test the soil pH, and amend it with organic matter if necessary.
-
Moisture: Ginger loves moisture, so consider incorporating coconut coir, which helps retain moisture without becoming soggy.
5. Planting Ginger in a Grow Bag
Once you’ve prepared your grow bag and purchased your ginger rhizome, you can start planting.
Steps to Plant Ginger:
- Fill the Grow Bag: Add your prepared soil mix to the grow bag, leaving about 2 inches of space at the top.
- Plant the Rhizome: Place the ginger piece (bud side up) about 2-4 inches deep into the soil. Ensure the growth buds are pointed upwards.
- Cover Lightly: Cover the rhizome with soil gently, being careful not to compact it too much, as this can impede root growth.
- Watering: Water the soil thoroughly until moisture drains from the bottom. Make sure the soil is evenly moist but not waterlogged.
6. Caring for Your Ginger Plant
Growing ginger is relatively low maintenance, but it does require some attention:
Light Conditions
- Indirect Sunlight: Ginger prefers partial shade. Place the grow bag in a location that receives bright, indirect sunlight. Too much direct sun can scorch the leaves.
Watering
- Consistent Moisture: Keep the soil moist but not soggy. Water regularly, especially during the growing season. Check the moisture level by sticking your finger into the soil.
Nutrients
- Fertilization: Fertilize ginger every 4-6 weeks during the growing season with a balanced liquid fertilizer or compost tea. This provides essential nutrients for robust growth.
Temperature and Humidity
- Ideal Conditions: Ginger thrives in warm temperatures (65-85°F or 18-29°C) and high humidity. If your area is dry, consider misting the leaves or placing a humidity tray nearby.
Pest Management
- Monitor for Pests: Keep an eye out for pests like aphids, spider mites, and fungus gnats. Use organic insecticidal soap or neem oil if you observe any infestations.
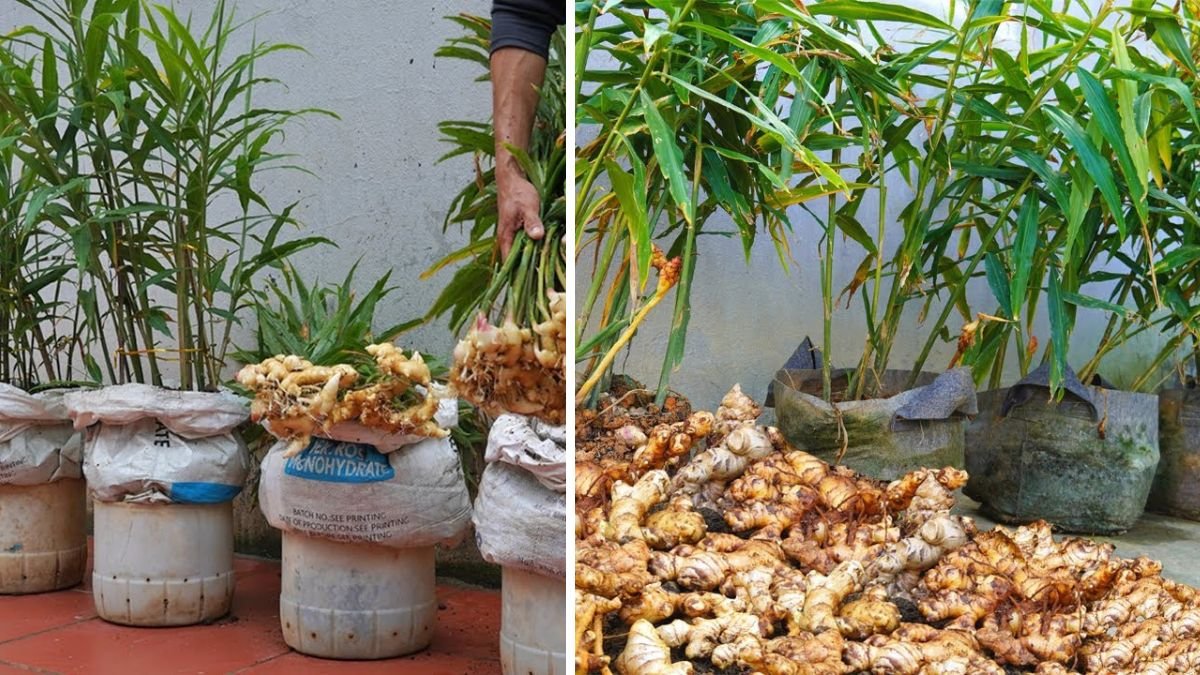
7. Harvesting Ginger
Ginger can take anywhere from 8 to 10 months to mature, depending on the variety and growing conditions. Here’s how to know when to harvest:
- Leaves: When the leaves start to turn yellow and die back, it’s an indication that the rhizomes are ready for harvest.
- Size Preferences: If you want young, tender ginger, you can harvest as early as 3-4 months after planting, when the rhizomes are still small.
- Harvesting Process:
- Gently dig around the base of the plant with your hands or a small garden tool.
- Carefully lift the rhizome out of the soil to avoid damage.
- Cut away what you need, leaving the rest of the rhizome in the soil for continued growth if desired.
8. FAQs
Q1: How much sunlight does ginger need?
Ginger prefers bright, indirect sunlight. Too much direct sunlight can damage the leaves, so a spot with filtered light is ideal.
Q2: When is the best time to plant ginger?
The best time to plant ginger is in the spring when temperatures are warm enough, ideally after the last frost date.
Q3: How often should I water ginger?
Ginger requires consistent moisture. Water the plant when the top inch of soil feels dry, ensuring not to overwater.
Q4: Can I grow ginger indoors?
Yes, ginger can be successfully grown indoors as long as it receives adequate light and humidity. Consider using grow lights if natural light is insufficient.
Q5: How do I know when ginger is ready to be harvested?
Ginger is typically ready for harvest when the leaves start to yellow and die back, usually around 8-10 months after planting. You can also harvest baby ginger as early as 3-4 months for a more tender taste.
Q6: What pests should I watch out for when growing ginger?
Common pests include aphids, spider mites, and fungus gnats. Regularly check your plants for signs of infestation and address them promptly with organic pest control methods.
Q7: Can I store ginger rhizomes for future planting?
Yes! You can store ginger rhizomes in a cool, dry place. Ensure they are unbroken and healthy. You can also refrigerate them to prolong their shelf life.
Conclusion
Growing ginger in a grow bag at home is an enjoyable project that rewards you with fresh, flavorful ginger for your culinary delights. By following the steps outlined in this guide, anyone can successfully cultivate this versatile plant. Remember to remain patient and attentive to your ginger plant’s needs, and soon you’ll be harvesting your own ginger in no time! Happy gardening!