Turmeric, known for its vibrant golden color and myriad health benefits, is a popular spice that originates from the rhizomes of the Curcuma longa plant. If you’re looking to grow this aromatic herb in your home garden, doing so in containers is an excellent option, especially if space is limited. Container gardening allows for flexibility, better control over soil conditions, and can even enhance the aesthetics of your outdoor space. This guide will help you understand how to grow turmeric in containers effectively and answer some frequently asked questions.
Understanding Turmeric
What is Turmeric?
Turmeric is a flowering plant belonging to the ginger family, Zingiberaceae. The rhizome, or underground stem, is the part commonly used as a spice, coloring agent, and culinary ingredient. It’s famous for its anti-inflammatory and antioxidant properties, making it a popular choice in natural medicine.
Benefits of Growing Turmeric
- Health Boost: Fresh turmeric is more potent than dried varieties found in stores.
- Versatile Use: You can use it in cooking, smoothies, teas, and even skincare.
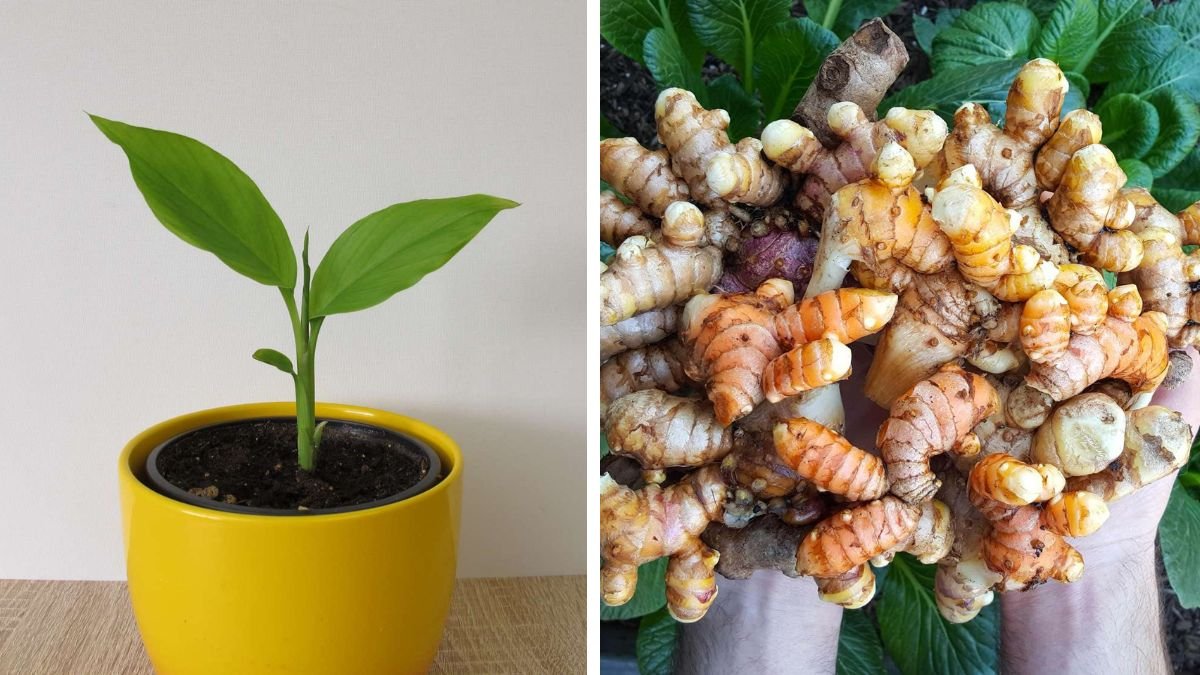
- Aesthetic Appeal: The large, lush green leaves of turmeric plants create a beautiful display in your garden or on your patio.
Container Selection
Choosing the right container is crucial for successful turmeric growth. Here’s what you need to consider:
1. Size
Choose a container that is at least 12-16 inches deep and wide. Turmeric has a rhizomatic growth pattern, so the more space you provide, the better your harvest will be.
2. Material
Containers can be made from various materials such as plastic, ceramic, or metal. Ensure that whatever material you choose has drainage holes to prevent waterlogging.
3. Drainage
Good drainage is essential for preventing root rot. If your container doesn’t have drainage holes, consider creating some or using a different container.
Soil Requirements
1. Soil Type
Turmeric prefers rich, well-draining soil with plenty of organic matter. A good mix would include:
- 50% potting soil
- 30% compost
- 20% perlite or sand for drainage
2. pH Level
Turmeric grows best in slightly acidic to neutral soil (pH 5.5 to 7.0). Testing your soil’s pH can help you adjust it, if necessary.
Planting Turmeric
1. Choosing Rhizomes
Select healthy, firm turmeric rhizomes from a reputable source or your local nursery. Look for rhizomes that have visible “eyes” or buds, as these will develop into shoots.
2. Preparing the Rhizome
If you’re using large pieces of rhizome, cut them into sections, ensuring each piece has at least one bud. Let these pieces dry for a couple of days to prevent rot when planted.
3. Planting Instructions
- Fill your container with the prepared soil mix, leaving about an inch of space from the top.
- Plant the rhizome section about 2-4 inches deep, with the buds facing upward.
- Water lightly to settle the soil around the rhizome.
4. Placement
Place the container in a warm, sunny location. Turmeric thrives in temperatures between 68°F to 95°F (20°C to 35°C) and requires at least 6-8 hours of sunlight daily.
Watering Your Turmeric
1. Moisture Levels
Turmeric likes moisture but does not tolerate soggy conditions. Water your plant regularly, ensuring the soil remains consistently moist but not waterlogged.
2. Signs of Overwatering
If you notice yellowing leaves or a foul smell from the soil, you may be overwatering. Adjust your watering schedule accordingly.
Fertilizing
1. Organic Fertilizers
For optimal growth, feed your turmeric plants with organic fertilizers high in potassium and phosphorus. Use a balanced fertilizer every 4-6 weeks, or side dress with compost to provide additional nutrients.
2. Signs of Nutrient Deficiency
Yellowing leaves or stunted growth can indicate nutrient deficiencies. If you notice this, consider using a balanced fertilizer to revitalize your plant.
Pests and Diseases
1. Common Pests
Watch for pests such as aphids and spider mites. A gentle spray of water can dislodge them, and neem oil is an effective organic treatment.
2. Diseases
Fungal diseases can affect turmeric, especially if the soil is too wet. Good drainage and air circulation can help minimize this risk.
Harvesting Turmeric
1. Timing
Turmeric typically takes about 8-10 months to mature. You’ll know it’s ready for harvest when the leaves start to yellow and die back.
2. Harvesting Process
- Carefully dig around the rhizomes with a shovel or trowel, ensuring not to damage them.
- Remove the rhizomes and rinse them under cool water to remove any soil.
- Allow the rhizomes to dry for a day before storing or using them.
Storing Turmeric
1. Fresh Storage
Fresh rhizomes can be stored in a cool, dry place for several weeks or refrigerated for longer life. Make sure to keep them in a breathable bag.
2. Dried Storage
If you plan to dry turmeric for long-term use, you can grate and dehydrate it. Store the dried powder in airtight containers away from light and humidity.
FAQs
1. Can I grow turmeric indoors?
Yes, you can grow turmeric indoors as long as it gets sufficient sunlight and warmth. A south-facing window is ideal.
2. How often should I water my turmeric?
Turmeric needs consistent moisture. Water whenever the top inch of soil feels dry, typically every 2-3 days, but this may vary based on your climate.
3. Can I use store-bought turmeric rhizomes?
Yes, but ensure they are organic, as many store-bought varieties are treated with chemicals that prevent sprouting.
4. How do I know when to harvest my turmeric?
Harvest your turmeric when the plant starts to yellow and the leaves begin to wilt, usually around 8-10 months after planting.
5. What pests should I watch out for?
Common pests include aphids and spider mites. Regular checks and natural remedies can help control them.
6. Can I propagate my turmeric?
Yes, by planting rhizome sections with buds. Ensure each section has at least one eye for successful propagation.
Conclusion
Growing turmeric in containers is a rewarding endeavor that can enhance your culinary experiences and health. By providing the right conditions and care, you’ll be well on your way to producing your own fresh turmeric at home. With this guide, you can successfully navigate the process, from selecting the right container to harvesting your golden rhizomes! Happy gardening!